How I Got a Flat Tummy in 30 Days!

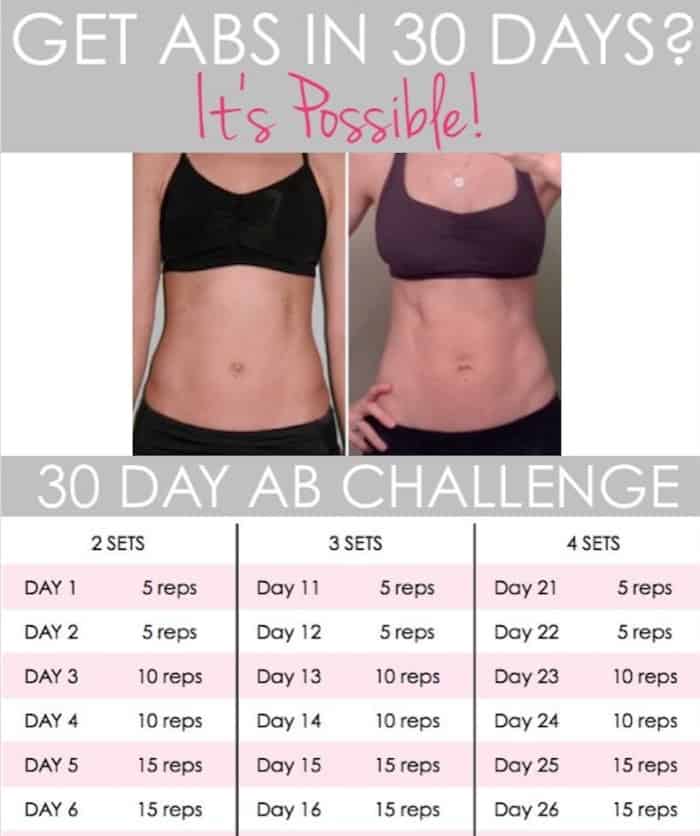
Want to know how I got a flat tummy in 30 days? Me too! I would love to know when the results shown in the photo below never happened to me in 30 days.

Over the weekend I received an email from a fellow blogger, thank you Sia, notifying me that another blogger was using one of my before and after photos to promote a 30 Day Ab Challenge for a flat tummy. The image was quickly gaining traction on Pinterest.

How I Got a Flat Tummy in 30 Days!

This made my jaw drop. I felt like I had finally made it as a “blogger”. My work was stolen and used without my consent.

And just so we are all clear on my work here, I mean selfies taken on my iPhone in the bathroom mirror.

I know it is probably lame that I got excited about this, but what is it that they say about flattery? 😉

Anyway, as flattered as I am that someone used my photo to promote their fitness challenge, I wish that my image had not been used in this way.

THIS FIRM FLAT TUMMY IS NOT FROM A 30 DAY AB CHALLENGE

I highly dislike the idea of people seeing that picture of my midsection and thinking that by doing a 30 Day Ab Challenge they can achieve those same results. Let’s chat about the photo for a second. Here is the original. As you can see the dates had been cropped out.

Before-After

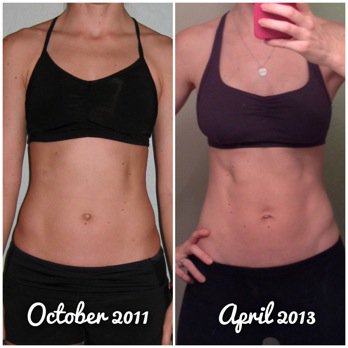
These two photos were taken 18 months apart. Not 30 days. This before and after photo was 547 days in the making.

In October of 2011 I had just found out I was pregnant. There was no flat tummy happening for numerous months between these photos.

I exercised throughout my entire pregnancy and my diet was very healthy. I also taught several group fitness and yoga classes weekly.

After my son was born I updated my progress monthly but two years ago decided to remove most of those posts for fear of my images being stolen to promote products I don’t use or believe in. My 10 Month After Baby Stats post is still published if you would like to read it.

On a side note, this photo created quite the controversial stir back in May of 2013 when I guest posted on FitLife.Tv. The majority of the comments about my article were not about the article itself but targeted this same photo. You can read all about this in my post The Problem with Body Bashing.

I did not do a 30 Day Ab Challenge for these results. When I workout I don’t ever focus on only my “abs”. I do however work my core and focus on all the muscles from the shoulders down to the quads.

I do NOT think there is anything wrong with my before picture. I love my flat tummy in both photos and I love my tummy now.

HOW TO SPOT A FAKE

I also really dislike the fact that the image was used by another “personal trainer” to promote themselves. There are tons of fitness bloggers on the internet who claim to be a personal trainer yet do not share how they are certified. This is a huge red flag. If a trainer is not forth coming in a Bio or About Section of their blog or website on the certifications they hold do not look any further into buying a program from them or paying for online coaching. This industry is super competitive and trainers pay $$$ each year to keep their certs current and have liability insurance. Legit trainers have certs and will place that information in an easy to find location on their website.

The next time you see a before and after picture that looks a little to good to be true, it is probably because it is too good to be true. Many supplement companies and fitness brands grow because of the success they have with sharing before and after photos. While reputable trainers and fitness bloggers use their own clients before and afters there are many Instagram, Pinterest, and Facebook accounts who are looking to promote their at home business by “stealing” someones hard earned before and after photo.

Before you Pin, Share, Double Tap, or Buy when you see another before and after photo determine first if it is from a legitimate source. Please remember, a firm flat tummy happens over time and with consistent effort and dedication both in the gym and in the kitchen. Not from being able to copy and paste a photo of another persons hard work.

Share

Breakfast Oatmeal Muffins

Happy New Year! I hope you had a Merry Christmas! Today I am sharing an easy to make breakfast that is perfect for a busy morning, breakfast oatmeal muffins. They are little cups of baked oatmeal goodness.

Breakfast is my very favorite meal of the day and since doing the Elimination Diet last year many of my loved favorites are no longer an option for me to eat. Eggs and my body do not agree with each other and sadly I have had to forgo my Blueberry Quinoa Pancakes and also Overnight Blueberry French Toast.

I have become a huge fan of hot cereals and love oatmeal, quinoa, and rice in the morning. The only thing with hot cereal is you have to plan ahead or wake up early to make sure they are done in time for the kids to eat. This isn’t usually a problem but on a rare morning that I happen to sleep in until Caden’s sweet little voice is telling me he is awake from the other room or Maisie little coos and giggles wake me up I need something that is a little quicker to prepare for breakfast.

Breakfast Oatmeal Muffins

These grab and go breakfast oatmeal muffins are great to make on the weekend so you have them for the week ahead. Plus any leftover breakfast oatmeal muffins can be easily frozen and reheated until needed. This is also the easiest recipe to follow. You dump all the ingredients into a bowl, mix well, and are ready to scoop the batter into the trays and place in the oven. It really doesn’t get easier than that for a homemade recipe. Oh, and did I mention they are egg free, dairy free, and gluten free!

Ingredients 

  • 5 cups gluten free rolled oats (I used Bob’s Red Mill)
  • 3 cups over ripe mashed bananas (5-6 medium bananas)
  • 1/4 cup pure maple syrup
  • 3/4 cup dark chocolate chips (I used Enjoy Life) or 1 cup blueberries
  • 1/4 cup melted coconut oil
  • 2 cups water
  • 1 teaspoon vanilla or almond extract (I did 50/50)

Directions

  1. Preheat oven to 350 degrees.
  2. In large mixing bowl combine all the ingredients. Mix well.
  3. Grease cupcake/muffin tray with coconut oil. Scoop mixture into tray. Bake for 25 minutes.
  4. Remove from heat. While still warm remove muffins from tray. Enjoy. These can be eaten right away or frozen and reheated for a delicious breakfast on a busy morning.

Yields: 24 muffins

Let me know what you think!

In case we are not Facebook friends or follow each other on Instagram I recently released my first 30-day fitness program. I will be sharing the details on it later in the week but if you want a sneak peek head over to my Online Coaching page.

Share

How to Find a Lost Diamond

I NEVER thought I would have a lost diamond story and I really never thought I would be typing up this post to tell you that I found my original diamond! Yes, you read that correctly. I found my diamond. I cannot even begin to tell you how ecstatic I was or how many times I prayed aloud “thank you Jesus”. Read my previous post if you missed it for all the details.

How to Find a Lost Diamond

This miraculous event happened the day after I picked up my ring with the replacement diamond from Shane Co.. Since I wasn’t entirely sure where I had lost the diamond it was difficult to go back and retrace my steps to a exact location of where it might be. I searched a parking lot, the car, a purse, and the house. Like a mentioned in my previous post, trying to find a lost diamond is like trying to find a needle in a haystack. It felt utterly hopeless.

The day after picking up my ring from Shane Co. I was still searching the house to see if I could locate my lost diamond. I had come to the conclusion that if I was meant to get my diamond back it would truly take a miracle. While cleaning the house again I decided to give it another last ditch effort, even though I was convinced that there was no possible way I lost the diamond in the house. I decided to empty the vacuum canister room by room into a bowl and sift through the gunk.

While vacuuming the third room I heard a clink as something hard hit the inside of the canister. Thinking there was no possible way that sound could have been made by my diamond I continued vacuuming the room. Once finished, I emptied the canister and there inside the bowl I saw it. My diamond. My diamond was in the house the entire time.

I am seriously still in shock as I type this and glance at my ring with the original diamond now back where it belongs. After the initial shock wore off that I had found my diamond my first concern was that I had damaged it somehow while vacuuming. I called Shane Co. and explained what had happened and let them know I would be coming in later that day with my original stone.

How I Found My Lost Diamond


To make this long story short, I returned the replacement diamond to Shane Co. and had my original no longer lost diamond inspected for damage (there was none thankfully) and reset in my ring. The staff at Shane Co. was again so amazing and very kind and kept thanking me for bringing back the replacement diamond. While the paperwork was being sorted out I kept singing the company’s praises to other costumers in the store who had overheard what had happened.

In case you are reading this and find yourself in the unfortunate circumstance of having lost your diamond here are a few of my tips on how to go about possibly finding it.

HOW TO FIND A LOST DIAMOND
  1. Pray and pray some more. I am a huge believer in the power of prayer.
  2. Write down everything you have done that day. Where have you gone? What have you done? List anything and everything.
  3. Grab a flashlight. Shine it across your floors, in your car, and every other possible space you have the ability to search. Pay attention to anything that reflects the light or sparkles.
  4. Time to vacuum your carpet. In order to not damage your diamond turn off the bristles. I wish I had thought of this after the fact but thankfully my lost diamond was not damaged. Vacuum the carpet in both directions to ensure you are covering the entire surface area of your floor. Empty the canister into a bowl and have it. It will probably be the only time in your life that you are eager to get your hands dirty from the gunk that you just removed from your carpet.
  5. Check the sinks and drains.
  6. If none of these suggestions worked don’t give up. It may take several attempts to find it in your house. I am a perfect example!
  7. If you believe the lost diamond happened while away from the house notify the management of any store, restaurant, gym, coffee shop, or school you visited.
  8. Check with your jeweler. Some stores like Shane Co. offer lifetime replacement on lost stones as long as the maintenance has been kept up on the ring. This leads to my next point…
 HOW TO PREVENT LOSING A DIAMOND
  1. Take your ring into a reputable jeweler for bi-annual inspections.
  2. Remove your rings when performing heavy activities like lifting weights or doing yard work.
  3. Between visits to your jeweler look at your ring more often. I know you probably look at your ring already but really look at. Inspect the prongs and make sure they are touching your diamond. If something doesn’t look right take it to your jeweler.

But in all seriousness I hope if you have lost your diamond that you are able to find it.

Have you ever lost your diamond? Were you able to find it? Let me know. If you have any other tips on how to find a lost diamond I would love to hear them.

Share