The Truth About Diastasis Recti & Healing Your Core

If you did not read last weeks post Prenatal Fitness, Diastasis Recti, & Body After Baby you might want to do that before you read further so you have some background on what it is I am discussing.

Medical Disclaimer: I also feel I need to put a disclaimer on this post and let you know I am by no means a medical professional or a diastasis recti expert. I am however a mother, certified personal trainer, and yoga instructor. What I am sharing is based on my own research and experience.

THE TRUTH ABOUT DIASTASIS RECTI & WHY IT MATTERS

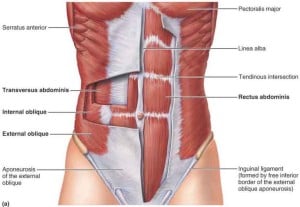
When abdominal separation occurs the rectus abdominis (otherwise lovingly referred to by many as the six-pack muscle) is not the only muscle that is affected. It is however what the majority of people notice. Take a look at this picture of the core musculature.

Core Muscles

Many of these muscles are attached to the same structures. The reason this is important to note is because when a muscle looses its stability it can cause a ripple effect throughout the entire body.

In the case of diastasis recti, the entire core of the body, glutes, ribs, pelvic floor, and the deeper core musculature become unstable. Diastasis recti can lead to low back pain, pelvic pain, incontinence, prolapse and urinary urgency/frequency. Women who have abdominal separation also tend to have a higher degree of pelvic floor and abdominal pain.

Hopefully you are starting to see this is a much bigger issue then just a bulging tummy. Diastasis recti can also alter the function and insertion of the transversus abdominis and external oblique muscles. The transverse abdominis is located under the obliques. It is the deepest abdominal muscle and wraps around your spine for protection and stability. Think of this muscle as your internal girdle. When this muscle is strong and well developed it will tighten and slim your waistline. But when this muscle is weak it will alter the basic function of many other muscles. This alteration in biomechanics and insertion can lead to abdominal trigger points. Trigger points are common causes of urinary urgency, urinary frequency and pelvic pain.

HEALING YOUR CORE

There are many factors that play into healing your body after having a baby. Here is a quick breakdown.

  • By 8-12 weeks postpartum your body has done what it will naturally do on its own. Your uterus has shrunk and whatever amount of abdominal separation you have remaining is most likely where it will stay until you intervene.
  • Adjust your thinking about how you are going to go about healing your body. You need to retrain the muscles that have been affected by birthing your baby. Instead of doing a million sit-ups, which by the way won’t do you any good closing your gap, focus on getting back to the basics. Keep reading to see what program I recommend.
  • While nobody likes to hear it, there are certain factors that will determine your rate of healing such as age, space between pregnancies, weight gain, nutrition, and genetics.
  • Keep in mind that no matter where you are in your post baby journey, maybe you had your baby last week or 10 years ago, there is always a way you can improve. Let me be honest, you might never close your gap completely, but you can always improve it. Don’t give up on yourself.

According to the American Congress of Obstetricians and Gynecologists the average distribution of weight gain during pregnancy is 30 pounds. This increase in weight causes internal pressure inside of the abdominal cavity. The pressure is upward, downward, and outward and is what creates the abdominal separation. Before any exercise this abdominal pressure needs to be addressed. There are several ways you can start addressing the pressure right now by adjusting the alignment of your body.

I am a huge fan and believer in chiropractic care. If you are local and need the name of a great chiropractor go and see Dr. Jason Taylor. He is awesome! Besides seeing a chiropractor there are several things you can do at home to begin to correct your alignment. How we sit, stand, and hold ourselves everyday can be adjusted to begin fixing this pressure.

How to Adjust The Alignment of Your Body
  1. Resist the urge to tuck your tailbone. Tucking your tailbone shortens the muscles in your pelvic floor and creates more upward pressure in your abdominal cavity.
  2. Stop sucking in your tummy. Gasp! I know right! But listen and hear me out. I promise this is not just crazy talk. When we suck in our belly’s everything that was hanging out has to go somewhere. So by sucking in we cause more downward pressure on the pelvic floor and further weaken those muscles.
  3. Relax your shoulders. Try not to hold tension in your upper body. Our entire musculature is interconnected by fascia and when the body becomes tight or tense in one spot it has a direct correlation on another.
  4. No high heels. When we wear high heeled shoes our alignment shifts forward. Elevating your heels places more of your body’s weight on your toes, which causes your body, particularly your pelvis, to tilt forward. To compensate and stay upright, you unconsciously lean backward and overarch your back, creating a posture that can strain your knees, hips, and low back.
  5. Find and work the transverse abdominis. Keep reading to see what program I recommend. I will also do a separate post on why this muscle is so important.
  6. Avoid exercises that open the gap. To see what to avoid read my last post: Prenatal Fitness, Diastasis Recti, & Body After Baby.

There are several programs available that focus on healing diastasis recti. I have looked into many of them. By far the best program that I have found and that I support is the Mutu System. The creator Wendy Powell is simply amazing. This program focuses on retraining the muscles in the body, healing the mommy tummy, and correcting the internal pressure.

You can get a free video with Wendy’s top 10 ab exercises by signing up on her website (top right corner).

The Mutu System offers a 12 week online program and I love it! It never expires and I am currently doing it right now, even during pregnancy. I will also be doing this program after baby girl is born.

I want to thank all of you for reading, commenting, and e-mailing me on this topic. It is nice to know that this information is helpful to you! If you are still wanting more information on diastasis recti please look into Wendy’s program. She is an expert on this topic and has spent years developing the Mutu System to help women reclaim and retrain their bodies after having a baby.

Make sure to share this post with your friends and social network. Let’s get this information out to all the moms we know!

You might also be interested in my Losing The Baby Weight Series! Topics include: Pregnancy & ExerciseWhat to Expect After DeliveryThe First Six WeeksNutrition, and Exercise.

Disclosure: I was so impressed with the Mutu System that I decided to become an affiliate for the program.  

Share

Core & Burpees

I love core work! You can be sure if that if you work out with me we will spend plenty of time focusing on improving and building core strength.

Your core muscles help support your entire body. Try not to limit your thinking of the core to just your abdominals. When you train your core you are also training your back, glutes, and all the muscles that run along your spine. When training this area you want to be sure and focus on the front  and back side of your body and not confine yourself to crunches and sit-ups.

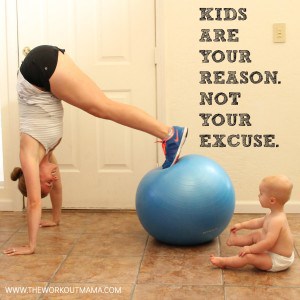
Core training is a must. The younger you are when you start training with your core in mind the easier it will be maintain it as you age. I want to be around as long as possible for my family, especially my son Caden. He has made me even more motivated to stay active and to fuel my body with nutrient rich foods. Thanks Caden!

Kids are your reason. Not your excuse.

Meet your exercises! (I did not include pictures for Burpees or Bicycle Crunches because I am fairly certain you all know how to rock those exercises.)

STABILITY BALL PIKES

Stability Ball Pikes

  1. Place your hands on floor in front and your shins on the ball behind with your arms straight.
  2. Drag the ball towards your body lifting your hips with your legs straight up and roll the ball down your shins to your toes.
  3. Keep your arms straight throughout the exercise.

BOAT POSE CRUNCHES

Boat Pose Crunches

  1. Start seated with your knees bent and your feet flat. Slowly lean back and lift your legs off the floor so that you are now balancing on your butt. Lengthen and flatten your back, trying to eliminate any roundness or arching.
  2. Lift through your sternum or upper chest. Slide your shoulder blades toward each other behind you and keep lifting long through your neck and head.
  3. Reach your arms forward and on an exhale begin to hover heels and shoulders 1 inch off the mat. Return to starting position on an inhale.

HIP DROP FOREARM PLANKS

Hip Drop Forearm Planks

  1. Get down on your forearms and feet (plank position). Make your body into a straight line so that it is parallel to the ground.
  2. Rotate at the waist and touch your right hip to the ground. Rotate back up and then to the left and touch your left hip to the ground.
  3. Alternate back and forth

BICYCLE CRUNCHES

  1. Lie on your back with your legs straight and your hands to the sides of your head.
  2. Raise your head and shoulders, bringing one knee above your hip and the opposite elbow to this knee, twisting your torso.
  3. Lower your upper body and leg to the floor and repeat on the other side with opposite leg.

KNEE TAP FOREARM PLANKS

Knee Tap Forearm Planks

  1. Get down on your forearms and feet (plank position). Make your body into a straight line so that it is parallel to the ground.
  2. Gently tap both knees to the mat and immediately straighten your legs. Repeat.

STABILITY BALL BACK EXTENSIONS

Stability Ball Back Extensions

  1. Lie facedown on a stability ball, hands behind your head, feet against a sturdy object.
  2. Squeeze your glutes and lift your torso up until your body forms a straight line. Hold for one or two seconds.
  3. Slowly return to start. That’s one rep.

BURPEES

  1. Begin in a squat position with hands on the floor in front of you. Kick your feet back to a pushup position.
  2. Immediately return your feet to the squat position.
  3. Leap up as high as possible from the squat position.

Here is the workout!

Core & Burpees

You will perform this for 3 rounds resting 1 minute between rounds. Try to get as many reps of each exercise in as you possibly can. This is a tough one!

If you liked this you will love my online bootcamp that is starting September 9th! This is the first ever session and I am so excited! Each week you will receive a weekly e-mail from me with your workouts. How cool is that! Plus 1 of the workouts will be a video that you can follow along with. So it will be like we are training together!

REGISTRATION FOR SEPTEMBER/OCTOBER 2013 SESSION NOW OPEN

Monday September 9, 2013 – Friday October 11, 2013 (5 Weeks)

Cost: $40 (That cost includes 3 weekly workouts plus access to a closed Facebook group to connect with your fellow bootcampers and myself)

——> CLICK HERE FOR MORE DETAILS<——

bootcamp-button

——> CLICK HERE FOR MORE DETAILS<——

I hope you enjoyed today’s workout! I love reading your comments. Let me know what you think!

XOXO, Tamara

Share